Your Cart is Empty
How to Change an Ebike Fat Tire | Step-by-Step Guide

Changing a fat tire on an e-bike is a crucial skill for riders, just like knowing how to effectively lock your bike. Unlike standard bike tires, fat tires present unique challenges due to their size and design. So, how to change an e-bike fat tire?
To change a fat tire on an e-bike, first remove the wheel, deflate the tire, and use tire levers to take it off the rim. After inspecting for damage, install the new tube or tire, fit it onto the rim, inflate to the correct pressure, reattach the wheel, and perform a final check on alignment and brakes.
To gain more insights about the process, below is a step-by-step guide to help you out.
When To Change Your E-bike Fat Tire: Signs to Look Out For
Recognizing the signs that it's time to change the fat tire on your e-bike is crucial for maintaining its performance and ensuring your safety. Fat tires, due to their larger surface area and unique design, may exhibit different wear patterns compared to regular bike tires.
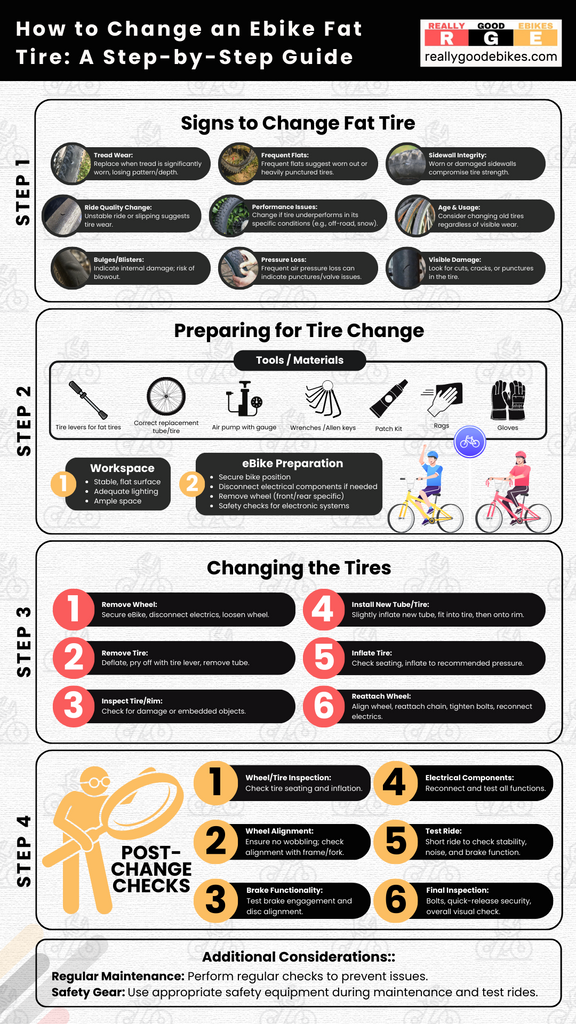
Here are key indicators that suggest it might be time to change your e-bike's fat tire:
Tread Wear
The most obvious sign is visible wear on the tire tread. If the tread is significantly worn down, losing its pattern or depth, it's time for a replacement. Fat tires often have distinct tread patterns designed for specific types of terrain, and worn treads can drastically reduce traction and handling.
Frequent Flats
If you're experiencing frequent flat tires, this could be a sign that your e-bike tire is worn out or has sustained too many punctures or cuts. A tire that's compromised in this way can be more susceptible to flats, even after repairs.
Visible Damage
Look for signs of cuts, cracks, or punctures in the tire. Over time, rubber can degrade, leading to cracks, especially in the sidewalls. Large cuts or punctures that are beyond simple patch repairs are a clear sign that the tire needs replacing.
Bulges or Blisters
Any bulging or blistering on the tire's surface indicates internal damage, likely to the tire's structure. Riding on a tire with such flaws can be dangerous as it may lead to a sudden blowout.
Change in Ride Quality

If you notice a decrease in ride comfort or handling, such as the bike feeling unstable or slipping easily, it could be due to tire wear. Fat tires are known for their comfort and grip, and any noticeable change in these areas warrants a tire check.
Age and Usage
Even if a tire isn't showing significant signs of wear, it's important to consider its age and how much it's been used. Rubber properties change over time, and an old tire, regardless of its appearance, may not perform as well as a new one.
If you're interested, you might want to read more on how long e-bike tires last.
Sidewall Integrity
Check the sidewalls of the tire for any signs of wear or damage. Sidewall issues can compromise the tire's strength and potentially lead to failure under the high loads and stresses encountered during e-bike riding.
Performance in Specific Conditions
If your tire is no longer performing optimally in the conditions it's designed for – be it off-road, snow, or sand – it might be time for a change. Fat tires are often used for their ability to handle specific terrains, and a loss of performance in these areas can compromise your riding experience.
Pressure Loss
If your tire is consistently losing air pressure more rapidly than usual, it might indicate issues like small punctures or valve problems. While these can sometimes be repaired, in many cases, tire replacement is the more reliable solution.
Preparation for Tire Change
Now that you know when it’s time to do a tire change, let’s focus on the preparation.
Preparing effectively for a tire change on your e-bike, especially when dealing with fat tires, is crucial for a smooth and safe process. Here's an elaboration on the preparation steps:
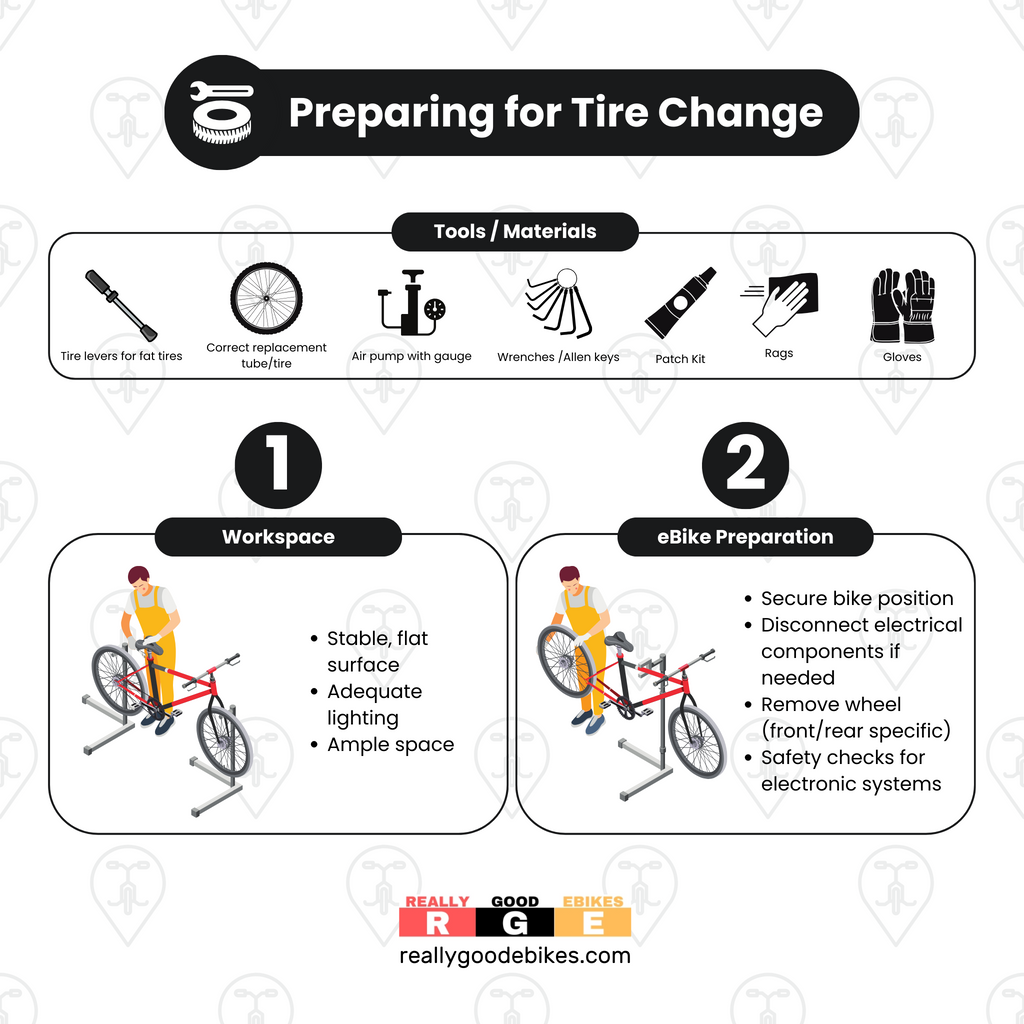
Gathering the Right Tools and Materials:
- Tire Levers: Choose sturdy tire levers designed for fat tires. These are essential for prying the tire off the rim.
- Replacement Tube or Tire: Ensure you have the correct size and type for your e-bike.
- Air Pump: A good quality pump, preferably with a pressure gauge, is necessary to inflate the tire to the appropriate pressure.
- Wrenches or Allen Keys: Depending on your e-bike’s wheel attachment, you might need specific wrenches or Allen keys to remove the wheel.
- Patch Kit: If you plan to repair a punctured tube, have a patch kit ready.
- Rags and Gloves: Keep rags for cleaning and gloves for protecting your hands.
Preparing the Workspace:
- Stable, Flat Surface: Choose a clean, flat surface to work on. A stable environment makes it easier to handle the e-bike and reduces the risk of the bike falling over.
- Adequate Lighting: Good lighting is essential to see what you are doing, especially when inspecting the tire and rim for damage or debris.
- Space: Ensure you have enough space to move around the bike comfortably.
Preparing the E-Bike:

- Secure Positioning: Position the e-bike so that it is stable. Using a bike stand can be extremely helpful, but if one isn't available, ensure the bike won’t tip over during the tire change.
- Disconnecting Electrical Components: If your e-bike has an electric motor, particularly in the hub, you might need to disconnect electrical connections. Make sure to turn off the power and carefully disconnect any cables. Be aware of how to reconnect these correctly after the tire change.
- Removing the Wheel: Depending on which tire needs changing (front or rear), the process for wheel removal will differ. For rear tires, this might involve dealing with the drive chain and motor connections.
- Safety Checks: Double-check that all electronic systems are turned off to avoid any accidental activation or electric shock.
Mental Preparation:
- Understanding the Process: Familiarize yourself with the steps involved in changing a tire. If you're unsure, consult the e-bike’s manual or watch instructional videos specific to your e-bike model.
- Patience and Care: Changing a tire, especially a fat tire, can be challenging. Approach the task with patience and be gentle with the components to avoid damage.
Step-by-Step Guide to Changing the Tire
Changing a tire on an e-bike, especially a fat tire, can be a bit challenging, but with the right steps and patience, it's a task most riders can handle.
Here's a detailed step-by-step guide:
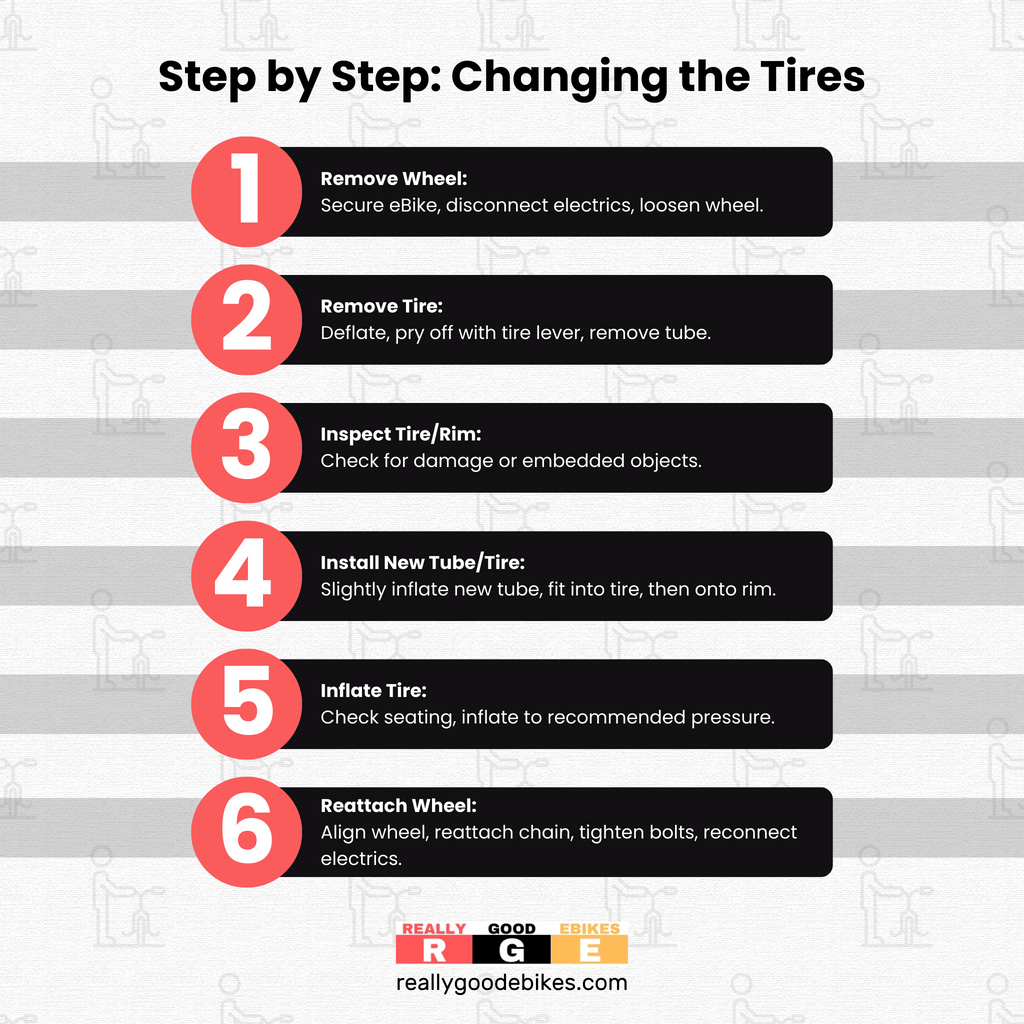
Step 1: Removing the Wheel
- Position the e-Bike: Secure your e-bike in an upright position, preferably on a bike stand. If you don't have a stand, ensure it's stable and won't tip over.
- Disconnect Electrical Components: For e-bikes with motor hubs, safely disconnect any electrical connections. Make sure the power is off.
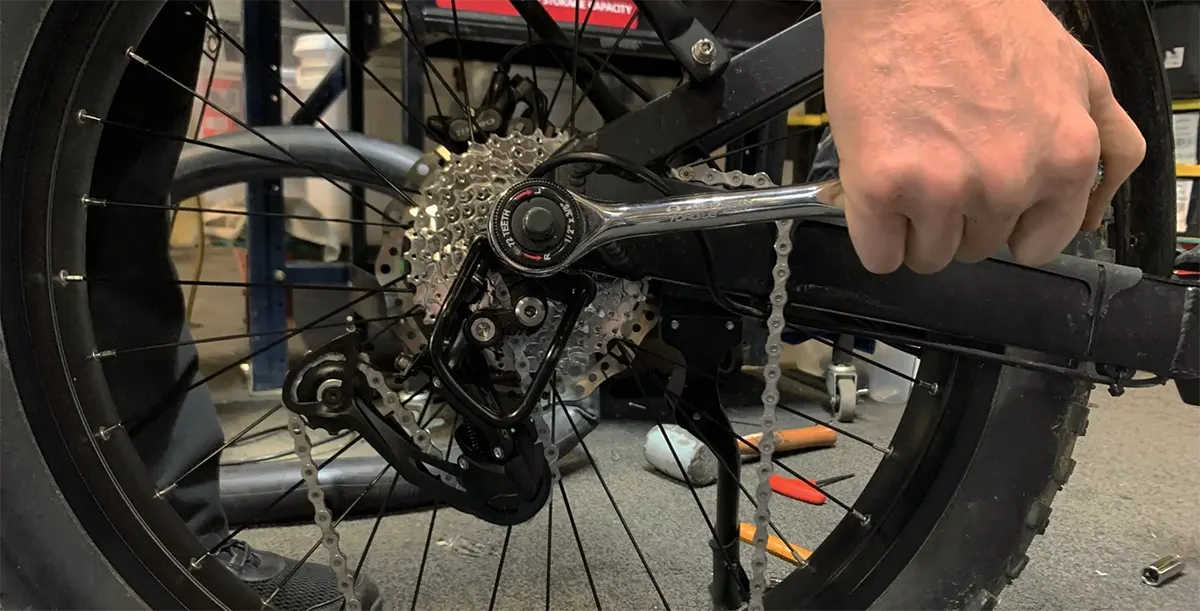
- Loosen the Wheel: Use the appropriate tools (wrenches or Allen keys) to loosen the bolts or release the quick-release mechanism on the wheel.
- Remove the Wheel: Carefully slide the wheel out of the frame. For rear wheels, this might involve lifting the chain off the gears.
Step 2: Removing the Tire
- Deflate the Tire: Fully deflate the tire if it isn't already flat. Press the valve to release all the air.
- Pry the Tire Off the Rim: Insert a tire lever under the edge of the tire and pry it away from the rim. Work your way around the rim with the lever, easing the tire off.
- Remove the Tube: Once one side of the tire is off, pull out the inner tube. Inspect it for punctures or damage.
Step 3: Inspecting the Tire and Rim

- Inspect the Tire: Look for any signs of damage, wear, or embedded objects like thorns or glass.
- Check the Rim: Inspect the rim for any sharp edges, dents, or damage that could harm the new tube or tire.
Step 4: Installing the New Tube or Tire
- Insert the New Tube: If replacing the tube, slightly inflate it to give it shape, making it easier to place inside the tire. Carefully place the tube inside the tire.
- Fit the Tire onto the Rim: Start at the opposite end of the valve, pressing the edge of the tire back onto the rim. Work your way around, using your hands to ease the tire back into place. The final section might require extra effort; tire levers can help.
Step 5: Inflating the Tire
- Check the Seating: Before fully inflating, ensure the tire is evenly seated around the rim.
- Inflate to Recommended Pressure: Using your air pump, inflate the tire to the pressure recommended on the tire’s sidewall or your e-bike manual.
Step 6: Reattaching the Wheel
- Place the Wheel Back: Carefully align and place the wheel back into the frame or fork.
- Reattach the Chain: For rear wheels, ensure the chain is properly looped over the gear.
- Tighten the Wheel: Securely fasten the bolts or close the quick-release mechanism. Reconnect any electrical components if applicable.
Post-Change Checks: What To Look Out For
After changing a tire on your e-bike, especially a fat tire, it's crucial to perform thorough post-change checks. These checks ensure that everything is in proper working order and that your ride will be safe and efficient.
Here's a detailed breakdown of the key post-change checks:
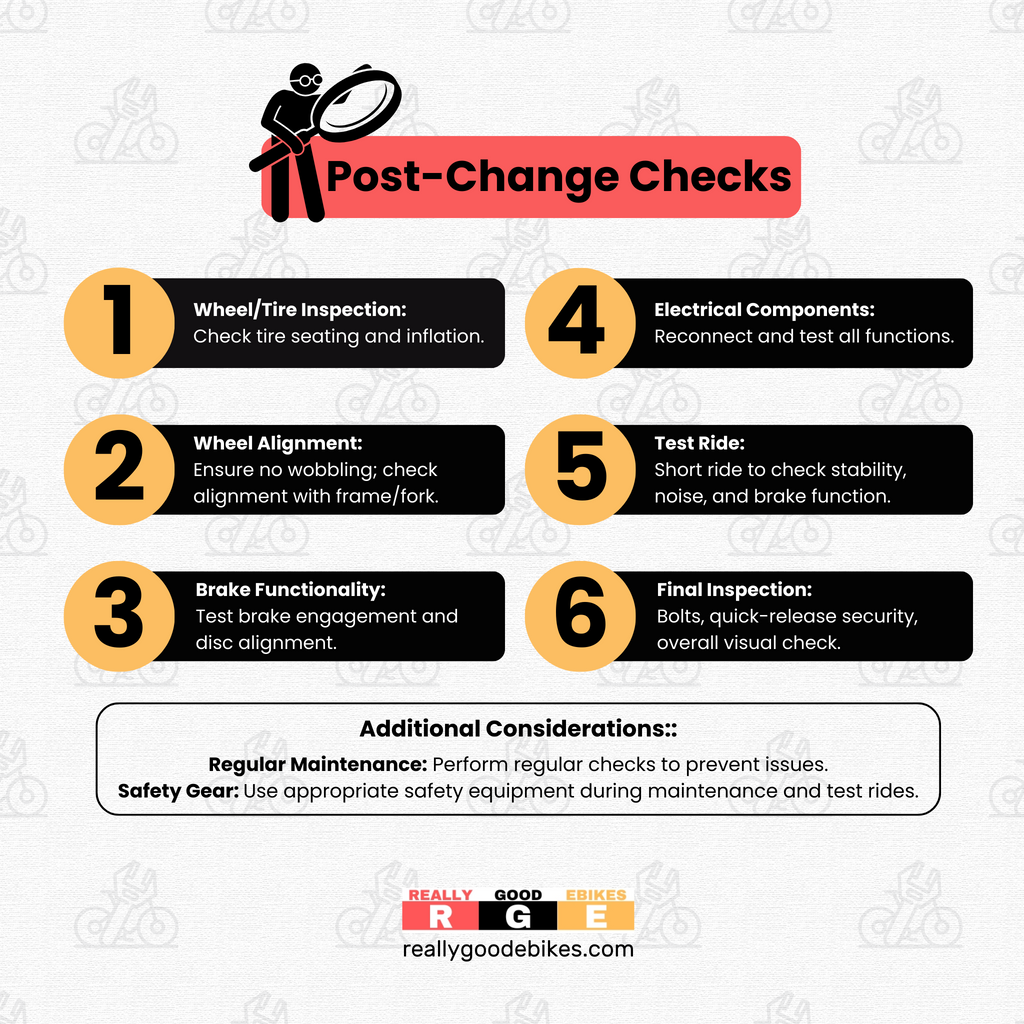
1. Wheel and Tire Inspection
- Proper Seating of the Tire: Ensure that the tire is evenly seated around the rim. An improperly seated tire can lead to uneven wear or even a blowout.
- Tire Inflation: Verify that the tire is inflated to the manufacturer's recommended pressure. Over or under-inflated tires can affect the bike's handling and increase the risk of punctures.
- Visual Inspection: Look for any bulges, twists, or areas where the tube might be pinched between the tire and rim.
2. Wheel Alignment
- Check for Wobbling: Spin the wheel and observe if it wobbles. A wobbling wheel indicates misalignment which can affect the bike's handling and cause uneven tire wear.
- Alignment with Frame and Fork: Ensure the wheel is properly aligned within the frame or fork. Improper alignment can affect braking and overall stability.
3. Brake Functionality

- Brake Engagement: Check that the brakes engage properly and evenly. Improperly adjusted brakes can lead to reduced stopping power or uneven wear on the brake pads.
- Disc Brake Inspection: If your e-bike uses disc brakes, ensure that the disc is not rubbing against the brake pads and that it is properly aligned.
4. Checking Electrical Components
- Reconnect Electrical Systems: If you disconnected any, make sure they are reconnected properly.
- Test Electronic Functions: Turn on the e-bike and test all electronic functions, including motor assist, lights, and display panels, to ensure everything is working correctly.
5. Test Ride
- Initial Test Ride: Conduct a short, controlled test ride in a safe area to ensure that the bike feels stable and responsive.
- Check for Unusual Noises: Listen for any unusual noises, which might indicate loose components or other issues.
- Brake Test: Test the brakes several times during the ride to ensure they are functioning correctly.
6. Bolt and Quick-Release Checks
- Tightness of Bolts: Ensure that all bolts, especially those on the wheel, are tightened to the correct torque.
- Quick-Release Security: If your bike uses quick-release mechanisms, double-check that they are secured and properly closed.
7. Final Visual Inspection
- Overall Inspection: Give your e-bike a final visual inspection to check for anything that might have been overlooked, such as loose cables or debris caught in the wheel or brakes.
- Additional Considerations
- Regular Maintenance: Remember that regular maintenance checks can help prevent issues and prolong the life of your e-bike.
- Safety Gear: Always wear appropriate safety gear when performing maintenance and during test rides.
Here's a recap of the entire process:
Conclusion
Maintaining the fat tires on your e-bike is not just about ensuring a smooth ride; it's a crucial aspect of your safety and the bike's overall performance.
Being vigilant about the signs of wear and damage - such as tread wear, frequent flats, visible damages, bulges, changes in ride quality, and age of the tire - is essential.
Regular checks and understanding when to replace your tires can prevent accidents and ensure that your e-bike continues to provide the comfort, stability, and traction that fat tires are renowned for.
Whether you’re an avid off-road adventurer or a daily commuter, the condition of your tires plays a pivotal role in your e-bike experience.
By keeping these considerations in mind and acting proactively, you can enjoy the many benefits of e-biking with confidence and peace of mind.
Remember, when it comes to e-bike maintenance, the tires are as important as any electronic or mechanical component, deserving regular attention and care.
Leave a comment
Comments will be approved before showing up.


